
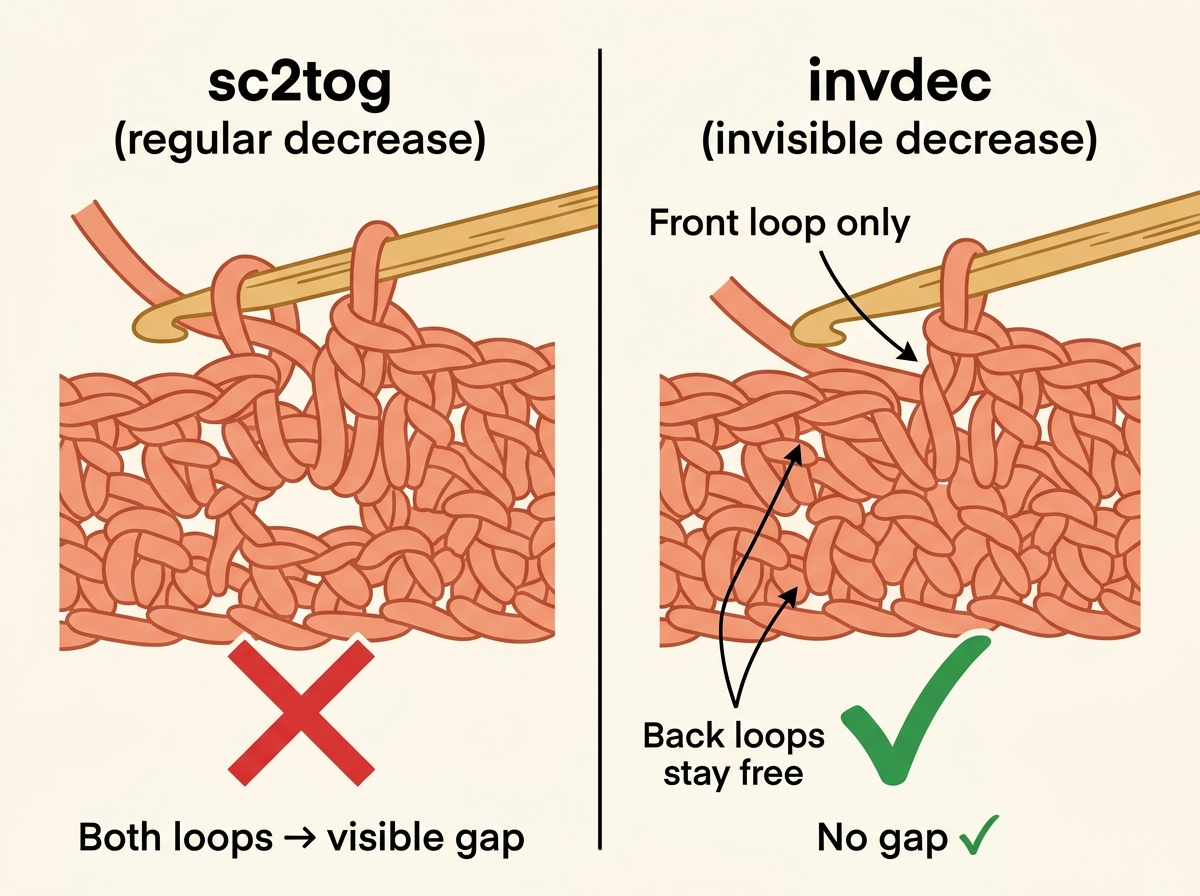
The invisible decrease (abbreviated invdec or sc2tog FLO) is a small technique change that makes a huge visual difference in amigurumi. Instead of the small V-shaped gap that regular sc2tog leaves on the fabric, the invisible decrease hides itself completely — giving your crocheted toys a smooth, professional finish.
Invisible Decrease vs Regular sc2tog — What’s the Difference?
Regular sc2tog: Insert hook under both loops of first stitch, then both loops of next stitch, yarn over and pull through all loops. This pulls the fabric tight and often leaves a visible horizontal bar or hole.
Invisible decrease (invdec): Insert hook through the front loop only of the first stitch, then the front loop only of the next stitch. Yarn over and pull through both front loops, then yarn over and pull through remaining 2 loops. The back loops stay in place and fold over, hiding the decrease completely.
How to Work an Invisible Decrease — Step by Step
Step 1: Identify Your Two Stitches
Look at the top of your work. Each stitch has two loops — a front loop (the one closest to you) and a back loop (furthest away). The invisible decrease uses only the front loops of two consecutive stitches.
Step 2: Insert Hook Into Front Loop of First Stitch
Insert your hook into the front loop only of the next stitch (do not go under the back loop). You have 1 extra loop on your hook.
Step 3: Insert Hook Into Front Loop of Second Stitch
Without removing your hook, insert it into the front loop only of the following stitch. You now have 3 loops on your hook total (your working loop + 2 front loops).
Step 4: Yarn Over and Pull Through Both Front Loops
Yarn over and pull through the 2 front loops only (not the original working loop). You now have 2 loops on your hook.
Step 5: Complete the Stitch
Yarn over and pull through the remaining 2 loops. One stitch complete — and the two back loops have folded over to hide the join. Stitch count: 1 st (decreased from 2).
Stitch Count Check
Every invisible decrease reduces your stitch count by 1. So if you have 24 stitches and work 6 invdec evenly around, you end with 18 stitches. In patterns, you’ll see it written as: Round 9: [invdec] × 6 [18 sts] — or the equivalent using sc2tog.
When to Use Invisible Decrease
- Amigurumi shaping: any decreasing round on a head or body
- Closing the bottom of a stuffed piece
- Toy faces: where every stitch shows prominently
- Chenille yarn: especially useful since chenille doesn’t hide gaps well
Common Mistakes
- Going under both loops: this turns it back into a regular sc2tog. Be precise — front loop only.
- Skipping the front loop of the second stitch: only decreases 1 stitch instead of combining 2.
- Too much tension: the invdec naturally pulls the fabric; don’t add extra tension or it bunches.
Invisible Decrease in Clara’s No-Sew Octopus
In Clara’s Free No-Sew Mini Octopus Pattern, the head is shaped with invisible decreases from Round 9 through Round 11, taking the stitch count from 24 down to 18, then 12, then 6 before the base is closed. Because the head is made in peach chenille, the invdec keeps the shaping smooth with no visible holes in the plush fabric.
FAQ
Can I substitute regular sc2tog for invdec?
Yes — the stitch count result is identical. The only difference is appearance. sc2tog works fine for practice projects; invdec is recommended any time the finished surface will be visible (faces, heads, bodies).
Does invdec work with other stitches?
The FLO principle can be applied to half double crochet decreases too, though it’s most commonly used and most effective with single crochet in amigurumi contexts.
My invdec still looks bumpy. What’s wrong?
Check that you’re inserting into the front loop only — not scooping under the whole stitch. Also make sure you’re working with the right side of the fabric facing out (the smooth side). In amigurumi worked in continuous rounds, the right side faces outward by default.
Related Techniques
These techniques are used together in amigurumi construction:
- Magic Ring — start every amigurumi round with zero gap in the center
- FLO & BLO — work into front or back loop only to create texture and joins


